To see your computer shutdown immediately after it starts is never a nice beginning. Not only is this experience frustrating, it is also one of the trickier problems to resolve since the causes can be traced to both hardware and software faults. Fortunately, there is a systematic approach that one can adopt to narrow down the reason and perform appropriate remedial steps to fix the problem. This article will go through them in detail, and help you identify the culprit effectively.
Prior to proceeding this piece for the solution, let be advised to first Scan and Fix your system’s concealed disorders which most probably is eliciting the inconsistencies:
- Step 1 : Download Systimizer – PC Cleaner & Internet Booster (Works on Windows 10, 8, 7 & XP)
- Step 2 : Click “Scan” to find system issues
- Step 3 : Click “Fix” to repair all anomalies
Step 1-Run Startup Repair
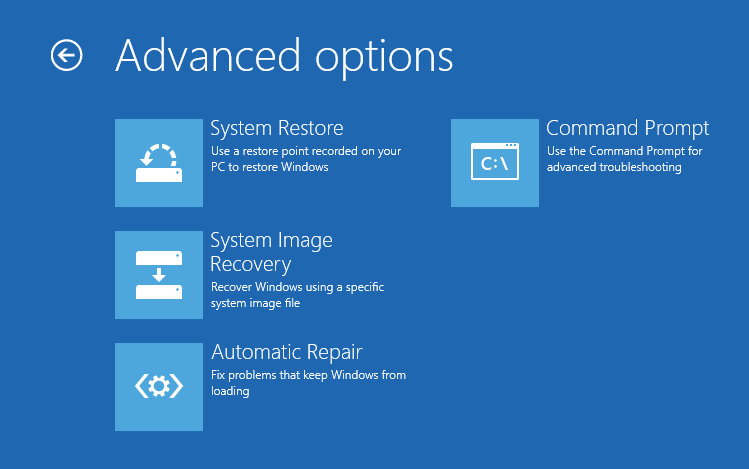
To get started, run automatic repair options incorporated into Windows 8 to scan for missing/corrupted system files crucial for Windows booting. This can be done by choosing Automatic Repair from the list of Advanced Options, demonstrated here:
- Enter Windows 8 (8.1) DVD or a Recovery Drive into the disc tray
- Restart your PC
- Hit any key when presented by the message Press any key to boot from CD or DVD
Note: if the message doesn’t appear, ensure correct booting order in the BIOS Boot submenu
- Click Repair your computer shown at the bottom
- Choose Troubleshoot to enter Advanced options
- Select Automatic Repair
Wait for the system to scan your drives and replace any corrupted or missing boot files to fix the loading problem. Once done, restart your Windows to verify the solution. If performing this step cured your issue, you had it easy. Otherwise proceed to the following options.
Step 2 – Fix Boot Loader Problems
MBR (Master Boot Record) is a special type of boot sector that contains executable code to function as the OS loader. One of the major reasons of a failed Windows start is a damaged MBR residing in the PC. To repair this, you can use certain commands from the elevated Command Prompt:
- Reach Advanced options as before
- Choose Command Prompt
- In the elevated window, type Bootrec /fixmbr
Upon seeing The operation completed successfully, try loading your Windows again. If the problem persists, enter these commands one-by-one into the Command Prompt for further scrutiny:
- Bootrec /fixboot
- Bootrec /scanos
- Bootrec /rebuildbcd
These instructions will write new boot sector to your hard drive, search for OS, add them to the boot configuration data, and finally allow you to choose the operating system to load. If this method didn’t ease your pain, carry on with the other solutions.
Step 3 – Perform System Restore
System Restore can return your system configurations and registry settings to a point in time before you noticed a problem. This will revert all potentially harmful changes made to the PC, including updating drivers, installing applications, messing with registry values, etc. To use this feature and go back in time, follow the steps listed below:
- Access Advanced options after booting from installation media
- Select System Restore
- Windows will reboot to the System Restore window
- Follow on-screen instructions
Step 4 – Monitor Temperature
One of the major reasons contributing to a failed booting process is computer overheating. This can damage internal modules physically, and lead to a system shutdown to prevent further injuries. To check your CPU status, use the in-built monitoring features accessible via BIOS:
- Reboot your machine
- Enter BIOS setup using the BIOS key (contact manufacturer for more details)
- Navigate to the option that displays hardware health, typically H/W Monitor, Status, or PC Health
- Check your CPU temperature
Under idle circumstances, the temperature should remain between 10-55 °C (Note: This may vary depending upon your chip module). However, if you are witnessing abnormal values ranging between 70-90 °C or above, the issue most definitely lies with your cooling mechanism. Immediately open system chassis and give the housed materials a proper scrub. This will remove dust particles that act as insulators preventing heat dissipation to the outside world. If the problem continues, replace your heat sink with a newer, more efficient device and ensure a good cooling mechanism freshening your machine.
Step 5 – Check Memory Sticks
Memory problems can lead to sudden crashes and disrupt processor flow instantly. To check for such errors, run Memtest86. This free memory diagnostic tool is an extremely easy to use software, designed to scan RAM and report invalid bits. Simply download the Free Edition ISO image from Memtest86 website, http://www.memtest86.com, and burn it on a disc. Reboot your system from this custom DVD and the memory diagnostic checks will start automatically.
If the scan notifies you of any errors, replace the RAM. This is most likely to cease your worry, and fix other system problems as well.
Step 6 – Reposition everything
Often, reseating every machine component works like a “magic fix” to startup problems like this. The procedure involves tightening any loose cords and ensuring firm positions of all devices. For correct route, focus on the following hardware:
- Internal data and power cables
- Memory modules
- Expansion cards
Also, unplug and reattach your keyboard, mouse and other external devices for best results.
Step 7 – Test your power supply
Just because you are able to start your PC doesn’t mean your power supply is in tip-top state. While it might not be logical for the computer to get past the initial setup, it does happen and is certainly worth a look.
You can test your supply either manually by using a screwdriver and a multi meter, or revert to automatic procedures by using Power Supply Testers. If you are willing to spend a few dollars on your system, I would suggest you purchase the latter and generate conclusive verdicts. If your unit is giving errors, replace the module instantly.
Step 8 – Inspect Motherboard PCB
Hurting the machine’s main organ, i.e. the motherboard is more than just detrimental for the computer. Inspect this hardware comprehensively for any signs of cracks, scratches, burn damage, or shorted wires to ensure full health.
Step 8 – Refresh Your PC
If performing the thorough hardware and software troubleshooting steps did not resolve your problem, Refresh your PC to obtain a completely new Windows but keeping your personal settings intact. This will erase all potentially harmful data from your drive, and reinstall the operating system. Rest assured, this fix will safely determine if the issue is indeed related to software or not. To accomplish this task, here is the procedure:
- Insert Windows 8 DVD
- Reboot your PC
- When prompted, Press any key to boot from CD or DVD, hit a key
- Click Repair your computer located below
- From the Choose an option screen, click Troubleshoot
- Select Refresh your PC
- Proceed with the directions presented on-screen
Try accessing your Windows again. If you are able to get past the logo screen, your problem lied with a buggy software which has now been resolved. However, if you are facing the trouble again, continue with the in-depth hardware analysis. Your best bet would be to remove all computer components and test them one by one by reattaching them to a working PC. Once identified, either try mending the particular hardware, or replace it entirely with a newer copy.

Hello, I chose the self repair option, and my computer has been showing *repairing* for about 2 days now, is this normal, does it require soo long to fix itself? If not, how do I go back to the main option, where I see the advanced option and all. Please help!
Well it takes minutes only.
You should reboot your system using the power/restart button and retry Automatic Repair.
Also check the other solutions.
You may also want to look into your Hard Drive.