It is not often that your computer plays the hide-and-seek game with your all-important HDD. But when it does, things can get extremely annoying. Similar scenario is observed by Windows 8 users who claim to ‘lose’ their secondary drive after performing the upgrade, and report constant Windows failures to detect the volume under Computer.
Prior to proceeding this piece for the solution, let be advised to first Scan and Fix your system’s concealed disorders which most probably is eliciting the inconsistencies:
- Step 1 : Download Systimizer – PC Cleaner & Internet Booster (Works on Windows 10, 8, 7 & XP)
- Step 2 : Click “Scan” to find system issues
- Step 3 : Click “Fix” to repair all anomalies
This article serves as a savior to such upgraders, listing easy checks to ensure safe reappearance of the unit. Execute these straightforward methods, and emerge the victor in this foolish, yet serious game.
Check BIOS
Firstly, you need to confirm Hard Drive recognition in the BIOS. This can be checked by accessing Setup screen and navigating to the appropriate menu:
- Reboot your computer
- Boot into BIOS (typically pressing DEL, ESC or F9 key. Consult computer manual for more information)
- Reach Hardware screen
- Check HDD status and ensure correct detection
If the concerned device is listed in BIOS, there is no problem within the hardware, and you can proceed to the next step. However, if this test results a negative, do the following to ensure correct physical connections:
- Unplug power cable from the computer
- Wait for 15 seconds to remove all residual current
- Open computer cover
- Reseat Hard Drive connections (both SATA and power connectors)
- Start the computer to check if the error is fixed. If the problem persists, continue with the following
- Switch to different SATA ports on motherboard
- Try a different SATA cable
- Boot the system to verify this procedure
Note: Refer to the manual for accurate instructions. If you are unsure of your hardware skills, seek technician’s help
Assign A Drive Letter
Sometimes, installing Windows 8 (8.1) loses the hard drive’s letter/path. This can occur because of the newly added drivers, or during the complex process of creating partitions. To fix this, here is what you should do:
- Open Run box by pressing Windows + R keys
- Type diskmgmt.msc and hit Enter
- In the Disk Management Window, right-click the troubled drive
- Select Change Drive Letter and Paths
- Click Change
- Check Assign the following drive letter and set the letter using the dropdown menu
- Click OK
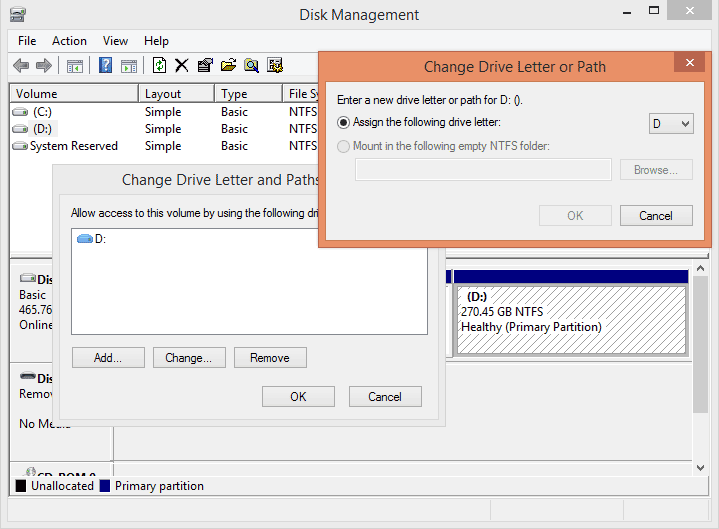
Reboot your system to apply the changes and open Computer to check whether the drive is now listed. If the issue is still not resolved, boot into Safe Mode and identify any misbehaving driver.
Boot Into Safe Mode
To boot into Safe Mode, execute the given procedure:
- Open Run box (Windows + R keys)
- Enter msconfig
- Click Boot tab
- Check Safe boot
- Click OK and reboot your system to launch Safe Mode automatically
Once in, open This PC window to see if the hard drive is detected. If Windows is successfully able to recognize the hard disk, your problem lies with some incompatible driver. To fix this issue, perform Windows Update to ensure your OS is using the most suitable drivers for running your system:
- Open Start Screen
- Type Windows Update in the Settings search bar and press Enter
- Click Check for updates now
- Follow on-screen instructions to install any available updates
Performing the above mentioned methods should help you view your Hard Drive safely. However, if you are still stuck with this delinquent, try using the component in some other computer. If it malfunctions in the other system as well, your problem revolves around a faulty drive, which should be replace.