Task Image is a constituent element of Task Scheduler, while the Task Scheduler is an important component of Windows operating system. It intends to perform various operations of a fixed schedule. These operations include Windows Updates, Windows Backup, Defragmentation, Disk Diagnosis, and other maintenance activities. These tasks are executed on the bases of either Time or Event. It is quite possible that a task listed within the task scheduler gets distorted. When the scheduler exercises of that specific task, an error occurs displaying the following message.
Prior to proceeding this piece for the solution, let be advised to first Scan and Fix your system’s concealed disorders which most probably is eliciting the inconsistencies:
- Step 1 : Download Systimizer – PC Cleaner & Internet Booster (Works on Windows 10, 8, 7 & XP)
- Step 2 : Click “Scan” to find system issues
- Step 3 : Click “Fix” to repair all anomalies
The task image is corrupt or has been tempered with.
Getting such prompts in a high frequency could be devastating, and the only way to get rid of this situation is by four simple workouts, described below. For an instance, let us suppose that Windows Backup is one miscalculated.
- Remove from Task Scheduler
- Remove from Windows Directory
- Remove from Windows Registry
- Recreate the Task
Each of the above activities will be performed for you in steps below.
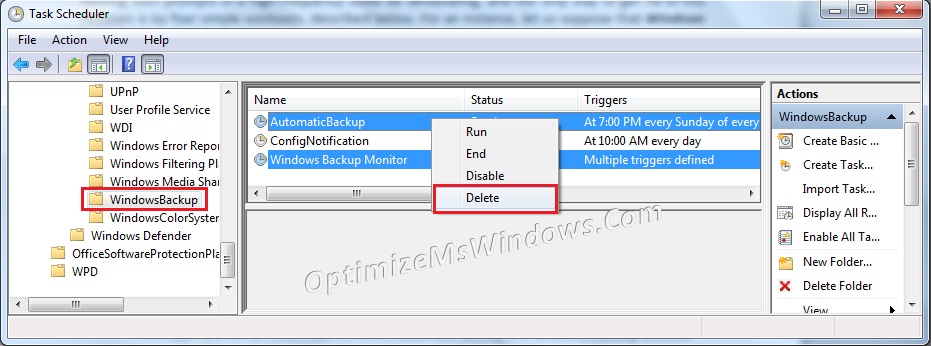
Remove from Task Scheduler
- Go to Start menu Search and type taskschd.msc in the search box
- Hit Enter key to open Task Scheduler
- In the left most panel, navigate through Task Scheduler Library to reach the following point
- Microsoft > Windows > WindowsBackup (in the hypothetical situation)
- In the upper portion of middle panel, locate Automatic Backup and Windows Backup Monitor
- Remove both the tasks by clicking right on them and selecting Delete
- Close Task Scheduler
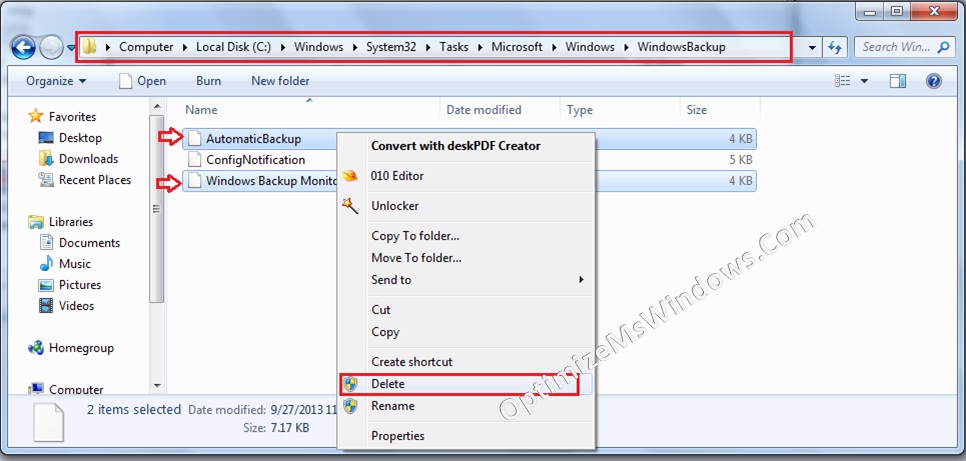
Remove from Windows Directory
- Open Windows explorer and navigate through the following route
- %windir%\System32\Tasks\Microsoft\Windows\WindowsBackup
- %windir% is the Windows folder in your system drive
- In this folder, remove the file Automatic Backup by clicking right and selecting Delete
- In the same folder, remove Windows Backup Monitor in the similar manner
- Close Windows explorer
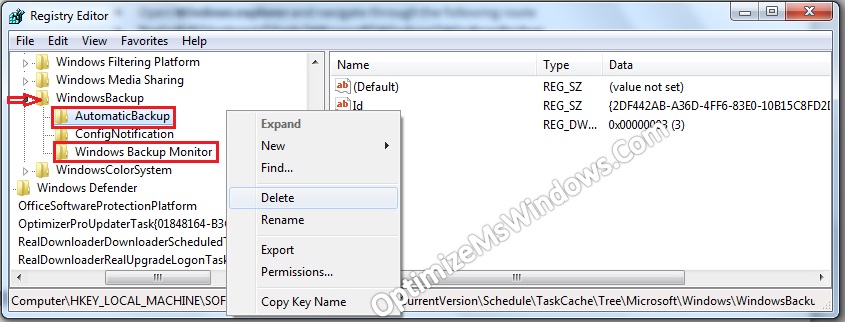
Remove Registry Keys
- Go to Start menu Search and type regedit.exe
- Hit Enter key to open Windows Registry
- In the left panel of Registry Editor, navigate via HKEY_LOCAL_MACHINE, to locate following key
- SOFTWARE \ Microsoft \ Windows NT \ CurrentVersion \ Schedule \ TaskCache \ Tree \ Microsoft \ Windows \ WindowsBackup
- Under WindowsBackup key, locate sub-keys AutomaticBackup and Windows Backup Monitor
- Right click both the keys, each at a time and choose to Delete
- Close Registry Editor
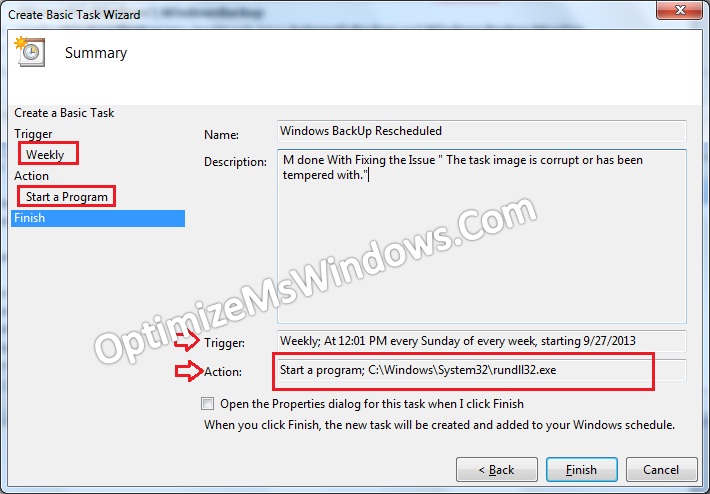
Recreate the Task
- Reopen the Task Scheduler by typing taskschd.msc in the Start Search
- Navigate to Task Scheduler Library > Microsoft > Windows > WindowsBackup
- Click the Action menu to Create Basic Task, and a wizard will appear
- Give a Name and Description to the new task and move to the Next screen
- Identify when to Trigger the task by setting a schedule and then move to the Next screen
- Identify what Action to be performed while executing the task and move to the Next screen
- Action: C:\Windows\System32\rundll32.exe
- Complete the Wizard through Finish button
Apart from the task considered in this scenario, you can troubleshoot other existing tasks or create new ones, through the procedures described above. It is recommended to have an overview via research before doing so.
Related Article

Awesome!!!!!!! Worked like a champ – thanks!!!!!!!!!
Thx*
Worked like a charm….Thanks.
thanking you regards owen ann
Thanks. Really excellent step by step instructions. Has worked well and sorted the problem.