The Blue Screen of Death (BSOD), commonly referred as a STOP error, is one of the bigger nightmares you can see with open eyes occurring on your Windows 7. It appears when the operating system encounters such a critical issue that it resolves to no other option but to automatically shut down and perform a reboot in order to save the device. This can possibly result in lost work, and certainly send a shiver or two through the user’s spine. If you are experiencing BSOD and finding ways to resolve it, follow this troubleshooting guide, and fix your BSOD error properly.
Prior to proceeding this piece for the solution, let be advised to first Scan and Fix your system’s concealed disorders which most probably is eliciting the inconsistencies:
- Step 1 : Download Systimizer – PC Cleaner & Internet Booster (Works on Windows 10, 8, 7 & XP)
- Step 2 : Click “Scan” to find system issues
- Step 3 : Click “Fix” to repair all anomalies
Solutions to BSOD Errors in Windows 7
Blue Screen of Death errors can be caused by issues in both, the hardware and the software, and are therefore difficult to diagnose and resolve using a single method. However, there exist numerous troubleshooting steps that one can follow to find the underlying cause and make the task easier. This section demonstrates the best such solutions that will help you fix BSOD errors in Windows 7:
Method 1: Perform a System Restore
The first step to troubleshooting BSODs is to identify what changes you just recently made to the system, and perform a System Restore to restore the previous settings. For example, you could have installed a new hardware, updated a driver, run a new program, tampered with the registries, etc. All these changes could have affected the system’s settings and changed the important system files, leading to the BSOD. In order to undo these recent changes, the easiest way is to perform a System Restore and bring it back to the earlier working state.
If you can start your Windows, do following:
- Open the Start menu and type system restore in the Start search. Hit Enter to launch the System Restore utility. If prompted by an administrator password, enter the password and confirm your identity.
- You will be presented by the System Restore box. Click Next, and then choose the restore point that you want to use.
- Click Next and then Finish to confirm your restore point
- Finally, click Yes to the Once started, System Restore cannot be interrupted. Do you want to continue? dialog box.
- Your windows will now boot from the chosen restore point and undo any system changes that may have caused the BSOD error.
Follow the steps below, If You Can’t Boot to Windows
- Insert the Windows 7 installation CD/DVD into the CD/DVD drive of the computer, and then restart your system
- When prompted by the message “press any key to boot from CD or DVD”, press any key.
Note: you will have to do this quickly since the message is displayed for only a few seconds. If you fail to do so, restart your system again and repeat this step.
- Select the “language”, the “time and currency format”, and the “keyboard or input method” according to your preferences. Press Next to continue
- Locate Repair your computer at the bottom and click it
- Choose the operating system and then continue by clicking Next
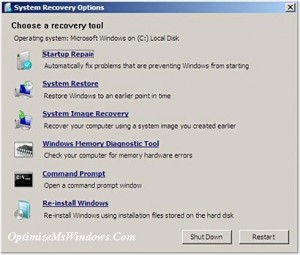
- Enable the option Use recovery tools that can help fix problems starting Windows. Select an operating system to repair. Select the desired operating system and click Next to open the System Recovery Options box
- Select System Restore
- Follow the easy instructions displayed in the System Restore box, and boot your system to an earlier restore point.
If System Restore did not resolve the BSOD startup and you still cannot access the Windows, perform a Startup Repair to replace missing or damaged startup files:
- Perform steps 1-6 from the method described above till you get to the System Recovery Options box
- Select Startup Repair
- Wait for the system to search for any corrupted or missing system files necessary for proper system startup. Confirm to any prompts recommended while processing.
- Click Finish once the Startup Tool finishes repairing any files. The windows will then boot to Windows 7
Method 2: Check for Solutions in the Action Center
Windows has the ability to automatically report for any hardware or software issues. You can check for the solutions to these reported problems using the Action Center utility. Follow the steps below to use this handy feature:
- Open the Action Center utility by clicking Start -> Control Panel -> System and Security -> Action Center
- Click Maintenance and then select Check for solutions listed under Check for solutions to problem reports.
- Windows for check for any available solutions, and notify you if there are any that could solve the problem
Method 3: Check for Software Updates using the Windows Update Feature
Microsoft periodically releases updates that can automatically resolve the numerous PC problems. Make sure you perform a regular Windows Update for keeping the latest drivers and software for your system. Follow the steps below to perform this task:
- Click Start
- Type windows update and click the icon Windows Update displayed on the search results.
- Locate and click Check for updates and wait till the Windows searches for the latest available updates
- If the Windows responds by displaying a message that says updates are available, click the message and select the desired updates
- Click OK and then install the updates by clicking Install updates
Method 4: Update Device Drivers
One of the leading causes of BSODs is an outdated or incompatible device driver. Drivers are the essential “connections” between the hardware and the operating system, and are thus essential for the operation of the device. Make sure your device drivers are updated and fully capable to handle the device.
You can manually update your device using the Device Manager feature in Windows:
- Navigate to Start -> Control Panel -> System and Security -> System
- Locate and open Device Manager from the left pane
- Double-click the device you wish to update
- View the Driver tab, and then click Update Driver. Next, follow the instructions and properly update your device drivers.
Method 5: Check for Errors in the Hard Disk or Memory
Sometimes, BSOD problems can occur due to hard disk or memory (RAM) errors rather than the software itself. In order to check for hard disk errors, perform the following steps:
- Open Start and then Computer
- Right-click the drive you wish to scan and click Properties
- Open the Tools tab and then click Check listed under Error checking
- Click Check now and follow the instructions to check for any hard disk errors
In order to check for RAM errors, perform the following steps:
- Navigate to Start -> Control Panel
- Type Memory in the search box and click Diagnose your computer’s memory problems
- Select when to run the Windows Diagnostics Tool and allow the system to repair any RAM problems.
BSOD errors are most likely to be corrected and fixed using the methods described in this article. However, if you find yourself still facing this problem and can’t seem to get it out from your system, you could reinstall your Windows 7 and start all fresh.
Related Articles: