With the introduction of Windows 7, Microsoft accomplished a lot in recovering the crashing issues of its previous operating systems. Although the crashes were reduced to a very small extent, their existence however cannot be denied. In Windows 7, whenever an application crashes to the desktop or stops responding suddenly, a crash dump file is created and preserved in the system drive. This file can be viewed with certain tools or shared with an expert to troubleshoot the main cause of crash.
Prior to proceeding this piece for the solution, let be advised to first Scan and Fix your system’s concealed disorders which most probably is eliciting the inconsistencies:
- Step 1 : Download Systimizer – PC Cleaner & Internet Booster (Works on Windows 10, 8, 7 & XP)
- Step 2 : Click “Scan” to find system issues
- Step 3 : Click “Fix” to repair all anomalies
Make sure your system is responsibly creating dump file on each crash. This file has a physical existence with the name Memory.dmp, place in the Windows directory. If you cannot find it in there, create one manually as stated below.
- Right click Computer and go to its Properties
- In the left pane click the text stating Advanced system settings
- In System Properties window, stay on the Advanced tab
- Under Startup and Recovery option, click to enter its Settings
- Make sure that Write debugging information is not set to (none)
- Right below appears the path of Dump file, which should be %SystemRoot%\MEMORY.DMP

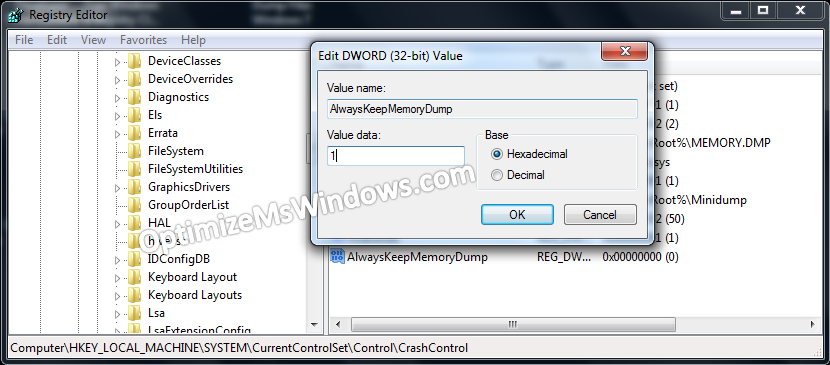
Furthermore, there are instances when Windows 7 no longer keeps crash dump files in case of system drive having less than 25GB of free space. To change this behavior of Windows:
- In Start menu Search type regedit and press Enter to open Registry Editor
- In the left pane, navigate through HKEY_LOCAL_MACHINE to reach the following key
- SYSTEM\CurrentControlSet\Control\CrashControl
- Now in the right pane, right click to create a New DWORD Value
- Name this value as AlwaysKeepMemoryDump and double click it to Modify
- Set its Value data as 1 to make it active
- Close Registry Editor and Restart your computer
Another highly debated subject in this context is the number of minidumps kept by Windows 7. By default, it maintains 50 minidump files in Windows\Minidump. You can manually increase or decrease this number in the following manner.
- In Start menu Search type regedit and press Enter to open Registry Editor
- In the left pane, navigate through HKEY_LOCAL_MACHINE to reach the following key
- SYSTEM\CurrentControlSet\Control\CrashControl
- Now in the right pane, locate a DWORD Value named MiniDumpsCount
- Double click this value to Modify
- Put a desired number in the field next to Value data making sure Decimal Base is selected
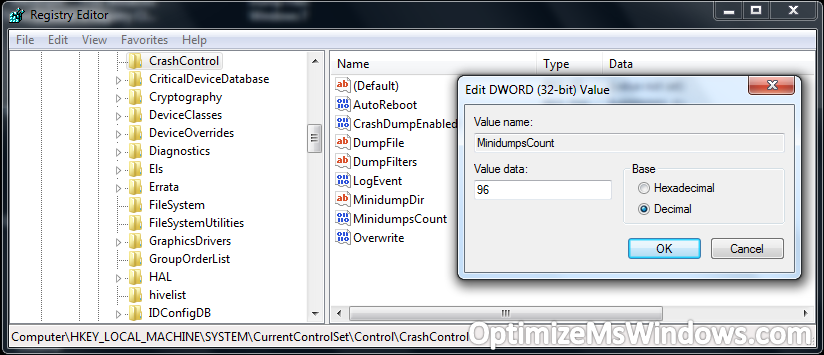
(The number in decimal based value data represents the number of minidump files)
Whenever you experience a system or application crash, you can access dump files in the paths mentioned above and share these files with an expert for prescribed solutions.